This post is to educate new users on the Dwitter syntax. If you have not checked out Dwitter, visit this site: www.dwitter.net
Dwitter is a social media website where users create and share tiny snippets of code that create great visual complexity. The authors are limited to 140 characters, much like Twitter. They must be excessively creative to code with only 140 letters, numbers, or symbols. (Here is my account, if you are interested in seeing my work.)
Dwitter is a very fun exercise for a variety of reason:
- It forces authors to write the most efficient code possible.
- It allows designers to make quick iterations for visual effects.
- It doesn’t require a text editor or installation of editing software.
- It just uses a browser.
- It uses abbreviated language from Javascript, so it is easy to pick up.
Getting Started:
First, create a new Dwitter account if you already have not done this: https://www.dwitter.net
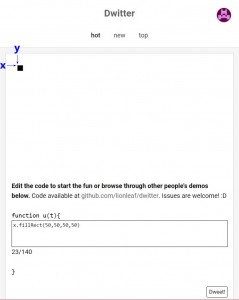
In the beginning, you will be prompted with a sample “Dweet” that makes some simple rectangles:
First off, Dwitter uses Javascript. So if you know Javascript or C-based coding, you are at an advantage. If you don’t, there is nothing to worry about. The main reason why is, in order to dweet your code, you need to use esoteric and often-unused abbreviations and symbols of Javascript coding. So basically, everyone is starting at ground zero regardless of your Javascript experience.
Next, Dweets are written in the textbox located underneath the “function u(t){” line. This line suggests that you are about to write a small function (subroutine) that will be contained between the braces { }. The name of the function is “u” and the argument (input) is the variable “t” which is an integer value of time (in seconds). So after one second, the value of “t” is 1; after two, it is 2; after three, 3; and so on. Any time you use the variable “t” in your code in the textbox, it will constantly be cycling endlessly until you refresh your browser.
Before I get any further, Dwitter has no autosave. If you refresh your browser, or if it crashes, or if it lags, or if anything disrupts your computer, you lose your code forever. So be sure to copy your code to clipboard regularly or to a text file occasionally just in case.
Abbreviated Commands List:
As stated before, Dwitter uses Javascript, so any Javascript command will work fine. However, the average Javascript command can use a dozen characters or more. That’s expensive when you only have 140 to work with. The developers of Dwitter have abbreviated some of the common commands for you. Here’s the list:
- “S” means sine ( )
- “C” means cosine ( )
- “T” means tangent ( )
- “R” means RGB value (aka Color), ranging from 0 to 255.
- “c” means the dimensions of the “canvas” or viewport of your Dweet.
- “x” means the object that allows you to draw on the pixels of the viewport.
So instead of writing the following line of code:
Math.sin(188);
on Dwitter, you can simplify that to:
S(188)
Colors in Dwitter:
If you are unfamiliar with what R or rgba-strings, here is a quick synopsis. All colors on a computer are broken down into three numbers, a R (red), a G (green), and a B (blue) value. These three numbers make all the possible combinations. An R or G or B value can be any integer (whole number) between 0 to 256. The bigger the number, the more dominate that particular color will be. If you want a blue color, the R and G will be small and the B will be bigger.
Blue: rgb(0, 0, 255)
Red: rgb(255, 0, 0)
Green: rgb(0, 255, 0)
If you want blended colors, just modify the other values. there are millions of combinations, so don’t bother with trial and error. Use an RGB color picker online, like this: https://www.w3schools.com/colors/colors_picker.asp
To convert this for Dwitter, just use the “R( )” command, like this:
Blue: R(0,0,255)
White: R(255,255,255)
Orange: R(255,126,0)
and so on.
Creating Geometry:
The viewport is made up of pixels. The top left corner is the “origin,” denoted as coordinate (0,0). When you move from left-to-right, that is the X-direction and ends at 1920 pixels. When you move from top-to-bottom, that is the Y-direction and ends at 1080 pixels. The bottom-right corner is the end of the viewport, located at pixel coordinates (1920, 1080). The viewport is effectively a grid that you can use to draw on.
Any command that is in Javascript is available for Dwitter. Ideally, it would be nice if more commands were abbreviated, like the aforementioned commands, but this is what we got. So, if you want to make a rectangle, you need to use the “.fillRect( )” parameters. That’s a minimum of 11 characters right there.
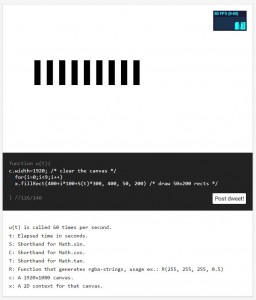
To make a simple rectangle, type this into your Dwitter textbox:
x.fillRect(50,50,50,50)
The first value is the x-coordinate pixel, the second is the y-coordinate of the upper left corner of the rectangle. So, this means the upper-left corner of our rectangle will be located at (50,50). The third and fourth values pertain to the size of the rectangle, where the width is 50 and the height is 50 pixels.
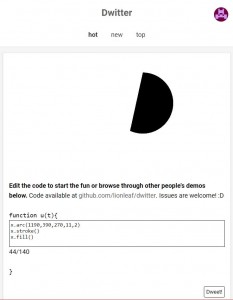
To make more complex shapes, you can use the javascript “stroke” and “fill” tools. For example, here’s a sample code on how to use “.arc”
x.arc(1190,390,270,11,2)
x.stroke()
x.fill()
If you remove the “x.fill( )” line of code, you will have the outline (width of a pixel) of the arc, which also provides a desirable effect.
If you want to adjust the line width, revise the code to remove the fill operation and use a lineWidth value.
x.arc(1190,390,270,11,2)
x.stroke()
x.lineWidth=50
Adjusting Colors:
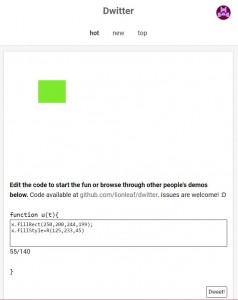
You can only color previously-drawn objects. You cannot just input a pixel coordinate and set the RGB. You must create an object like with .fillRect( ), then adjust the color with .fillStyle( ). By default, all objects drawn will be black. If you want to adjust the color, try something like this:
x.fillRect(250,200,244,199);
x.fillStyle=R(125,233,45)
The first line creates the rectangle, and the second line alters the “style” to be a certain color.
Using the Time (t) Variable
In the beginning of this article, the variable “t” was explained. To reiterate, this stands for “time” and consists of an integer that is increasing by one every second. You can utilize this value to animate your Dweets.
There are two ways to animate: One where your Dweet “refreshes” with every cycle of the code, and one where your Dweet “remembers” the history of the movement. Think like a camera that has an long exposure.
To refresh your screen every time, you need to use the “c” object. This will “clear” the screen with every iteration.
To make a rectangle that moves to the right, just use this:
c.width=1920
x.fillRect(212*t,200,244,199)
To make a rectangle that moves in a wave to the right, try this:
c.width=1920
x.fillRect(212*t,200*S(t)+200,244,199)
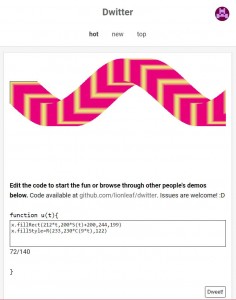 In the previous Dweet, you will see the use of the “S( )” sine function. If you are not familiar with sine, cosine, or tangent math functions, please read up on basic unit circle and trigonometry.
To make a rectangle that leaves a trail of pixels, leave out the “c.” operation, like this:
x.fillRect(212*t,200*S(t)+200,244,199)
To add color variation to the animation, use the fillStyle command, like this:
x.fillRect(212*t,200*S(t)+200,244,199)
x.fillStyle=R(233,230*C(9*t),122)
In the previous Dweet, you will see another abbreviated command, “C( ).” This stands for “cosine( )” and will create a -1 to 1 value with respect to whatever the time value (t) is at that moment. By using more numbers inside and outside the parentheses, you can alter the magnitude and frequency of the color change. The same can be done with the S( ) function in the movement and animation of the trail.
Operators:
Javascript has MANY operators. These are things like addition, subtraction, multiplication, division, and so on. C language coding has many shortcut abbreviations to do typical operations. Like if you want to add one to the existing variable, you can use a simple “++” after the name. Logical operators, like Boolean union and intersections, are exposed as && and ||, and will return a one or a zero for your code. Even things like the modulus (which returns the divided remainder number) is exposed. There are dozens of these operators, that I won’t bother going in depth here. There are many places on the web that detail the various operators that ultimately are the most important part of Dwitter. The more you understand these operators, the more likely you will be able to reduce your character usage, and the more intelligence you can infuse into your visual design.
Variables:
With only 140 characters, you need to take advantage of every digit. A good way to save space is to employ variables. Since Dweets don’t care about casting or declarations, I won’t even bother going into them. To make a variable for future use, define a lowercase letter that isn’t already used as a command or abbreviation.
A simple variable is to contain mathematical equations. You can use a series of operators once, and then use that variable many times later in the code.
d=5*8+1;
For example, if you want to make a variable that is changing with time in a sine wave, try this:
b=S(t);
Be sure to use a return line or a semicolon to force Dwitter to know you have ended that variable equation.
Loops:
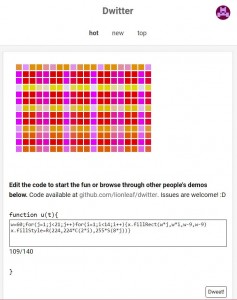
Using nested loops to make a grid of rectangles in Dwitter. Using the loop counters to alter the colors too.
If you want to make more than one object active in the same cycle, you will need to employ loops. Loops just allow you to repeat a command. The standard way of making a loop is to use the start, end, and increment syntax.
for(i=0;i<10;i++) { }
To briefly explain this, “i=0” means start with zero, “i<10” means do this until i is less than ten, and “i++” means to add one every cycle. You put your code inside the braces { } and it will run every time until the end condition is satisfied. The variable “i” is a counter. It keeps a tally of how many times it cycled.
In the following examples, the bold font items show how these minor changes can make significant differences.
Here is a sample loop Dweet that makes a string of blue squares vertically:
w=60;for(j=1;j<11;j++){x.fillRect(900,w*j,w-9,w-9)
x.fillStyle=R(4,4,255)}
Here is a Dweet where green rectangles are looping to the right.
w=60;for(j=1;j<21;j++){x.fillRect(w*j,w,w-9,w-9)
x.fillStyle=R(24,224,55)}
Here is a Dweet where grey squares are looping diagonally:
w=60;for(j=1;j<21;j++){x.fillRect(w*j,w*j,w-9,w-9)
x.fillStyle=R(124,124,155)}
You can even use loops inside of loops to increase dimensionality. For example, if you want to make a field of boxes, you can nest a loop to make a row in the X-direction for every cycle of the Y-direction.
Here is a Dweet where pink squares are looping in a grid:
w=60;for(j=1;j<21;j++)for(i=1;i<14;i++){x.fillRect(w*j,w*i,w-9,w-9)
x.fillStyle=R(224,124,155)}
Here is a Dweet where the colors change as the grid is cycled:
w=60;for(j=1;j<21;j++)for(i=1;i<14;i++){x.fillRect(w*j,w*i,w-9,w-9)
x.fillStyle=R(224,224*C(2*i),255*S(8*j))}
By using the values of the “i” and “j” counters from the loop definition, you can alter the colors (using a simple sine or cosine wave) to make a more colorful visual effect. Employ the “t” variable to animate the color as well. (See the image to the right)
Conditionals:
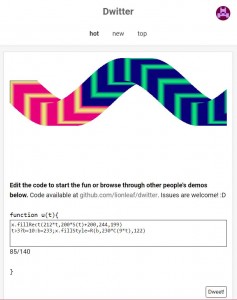
A Dweet containing an abbreviated javascript conditional, which alters the color midway through the animation.
If you know basic coding, you probably are familiar with conditionals. These allow you to check if something passes a basic test. A simple conditional is “if 3 > 2 then ok else not ok.” You can look up how to make conditionals with Javascript on your own. But the standard way to do conditionals with C coding uses A LOT of characters. So this article will limit to the cool spiffy esoteric way that most people do not usually utilize.
If you wanted to test something, use syntax like this:
t>10?b=3:b=7
You are probably wondering what is this gobbledygook. It’s actually pretty simple. The first part pertains to the conditional:
t>10?b=3:b=7
The question mark denotes the end of the condition.
t>10?b=3:b=7
The second section contains the “if true” result.
t>10?b=3:b=7
The semicolon denotes the end of the “true” result.
t>10?b=3:b=7
The last section contains the “if false” result.
t>10?b=3:b=7
There you have it. Don’t use anything else for conditionals.
The image to the right has a great example on how a variable in a conditional can alter the color midway through the animation.
Later updates to this post will contain topics regarding recursion, functions, and other important utilities. At this point, you should be able to get a good start.
This post will be updated with more information on how to expand your syntax repertoire. Stay tuned for updates. Please feel free to add in the comments as well.



![[0001D Video] Timelapse of “Randomized Node” Polyline Drawing](https://www.nickpisca.com/sherpa/wp-content/uploads/2015/03/20150302_MTloting2sfw.jpg)
x.fillRect(250,200,244,199);
x.fillStyle=R(125,233,45)
The first line creates the rectangle, and the second line alters the “style” to be a certain color.
Not so. Setting x.fillStyle sets the fillStyle (color, here) of the canvas drawing context and that color will be used on any subsequent fillRect() or fill() calls. In your example, at time t=0 a black rectangle will be drawn, quickly followed up by a green rectangle on all subsequent frames.
Excellent. Thanks for the comment, and I’ll revise the main text. Your comment is one of the main reasons why I started this thread, so users can get clearer advice on how to use Dwitter. 🙂
Hi, Nicholas! Great blog post about dwitter, I think it’s awesome that you made this thorough introduction for new users coming to dwitter and being confused by all the different hacks and pieces.
I took some of your advise and started redesign the UI for creating new dweets today. There’s still a lot to be done, especially adding a small tutorial explaining all the cryptic functions and how the canvas works. Still I think I at least made things a bit clearer by removing a few of the things you mentioned!
Cool! I’ll check it out right away. I’ll revise the post to be a little less aggressive in the beginning, and include all your revisions. 🙂
I’ll update the Dwitter Primer with even more information very soon.
Ok.
Hey Nick, cool guide! It’s still the first result when you Google ‘dwitter tutorial’
There are a few things I’d like to mention, should you care to ever add to this.
1 Debug using throw: If you want to quickly see the value of some expression, you can use the throw keyword at the end of your dweet to print it as an error message in the editor.
2.Ternary conditionals: I’m a js developer and it hurts that you’d call these esoteric, but whatever. These types of conditional statements evaluate as an expression, making it possible to use the value anywhere you would use a variable or literal. That means it can be used in an variable assignment or a function call. With that in mind the example you gave could be shortened from
t>10?b=3:b=7to
b=t>10?3:7which is a 2 character save, although arguably harder to read.
3.Save a character in loops: You can save a whole character (wow) in the most common kind of for loops by writing them like this:
for(i=0;i++<9;)It will have the the exact same effect because the increment operator doesn’t change the value of i until it has been compared to 9
Cool stuff! Thanks for posting. 🙂